Today I met Berkshire Athenaeum Director, Ron Latham, at Pasko Frame and Gift Center on North Street in Pittsfield to select the perfect mat and frame treatment for the painting. It should be completed within about 2 weeks. And since I work part time at Pasko's, I'm guessing that I'll also do the framing!
Soon I will be removing the digital frame and various other remnants of the project from the library. I have to say that it was a wonderful experience for me, and I hope others enjoyed it as well.
Tuesday, June 2, 2009
Painting is Assembled

On Thursday, May 28, I brought my laptop to the library with the files of the scanned image. I use an older version of Photoshop (CS2) which doesn't have the feature that assembles the image pieces automatically, so, I was doing it manually, as I have done with all my other paintings. This was especially difficult trying to morph the 10 different files and I was not having fun. But the upgrades to Photoshop are pretty pricey so I did not see an alternative.
In the midst of this exercise, I was visited by Ann-Marie Harris, a library employee who is involved with some of the technical responsibilities and was interested in seeing this done manually. And she told me something that will save me hours of time in the future and I will be forever grateful.
There is a product also made by Adobe called Elements. It is a very scaled down version of Photoshop at about 1/10 the price; it uses the same files and the latest version of Elements does have this morphing feature, called Panorama Merge. I ordered it that afternoon, had it the next day and the painting was reassembled by Friday night, looking much better than I could ever have done by hand.
Thank you thank you thank you!!!!!
Wednesday, May 27, 2009
Not Done Yet!
The painting may be completed, however, that doesn’t mean the project is. Fortunately for me I love jig saw puzzles, because the next steps require some skill in that area, plus a LOT of patience.
Scanning
At the end of Day 10, I took the completed painting home in order to scan it. The painting is about 18” x 28”, but the surface on my scanner bed is only 8” x 12”. It is also important to overlap each scanned image by many inches. It required 10 different scans in order to include the entire painting, scanned in at 300 dpi. Each piece is about 25 Mbytes.
You may ask why should I bother with this tedious process when I have taken a high resolution digital photograph? Good question. The quality of a photo (which has to deal with atmosphere, camera movement, lighting inconsistencies, distortion, etc.) cannot compare to a scan, which is a first generation reproduction without any of the camera issues. And if reproductions are to be enlarged and printed on fine art paper, the difference is amazing. A scan done correctly looks just like an original painting.
Scanning
At the end of Day 10, I took the completed painting home in order to scan it. The painting is about 18” x 28”, but the surface on my scanner bed is only 8” x 12”. It is also important to overlap each scanned image by many inches. It required 10 different scans in order to include the entire painting, scanned in at 300 dpi. Each piece is about 25 Mbytes.
Here are the individual pieces that will have to be reassembled. Some of this will be done tomorrow (Day 11) in the library on my laptop so anyone who is interested in the final high tech stage can see it "morphed" before your eyes.
You may ask why should I bother with this tedious process when I have taken a high resolution digital photograph? Good question. The quality of a photo (which has to deal with atmosphere, camera movement, lighting inconsistencies, distortion, etc.) cannot compare to a scan, which is a first generation reproduction without any of the camera issues. And if reproductions are to be enlarged and printed on fine art paper, the difference is amazing. A scan done correctly looks just like an original painting.
Day 10 - Painting is Finished!
Today is Day 10 and the painting is now finished, signed, and dated (year only). It was done entirely in the library, nothing painted at home. The final touches today included lettering “Berkshire Athenaeum” and “Public Library” on the building, doing a little highlighting and deepening of shadows, and adding “Bo”, the Obama’s pup. The painting portion of the project took just under 20 hours; however, some of that time was spent talking to visitors too. I always tried to get myself there early and be set up in order to spend the full 2 hours in place. And, I only got one parking ticket the entire month!
Here is the final photograph of the painting.

Here is the final photograph of the painting.
Thursday, May 21, 2009
Day 9 - Details, details, details

The painting is nearly finished now, still more lettering to do, maybe add a dog to accompany the Obamas (as a number of visitors pointed out to me...."you must have the dog too!"). I removed all the masking and freshened up the trees, adding more foliage and blossoms, and I put more color into the sky. I also pulled out my white gauche (white opaque watercolor) to brighten up a few places. There is always a problem in knowing when to stop...by painting too much one runs the risk of overworking the painting, so I'm going very slowly now.
Wednesday, May 20, 2009
Day 8
Only 3 more sessions to go, and I think everything is on schedule. Today I removed some of the masking and worked on the sky. Also added shrubs in the foreground, and more of the tiny details. The lettering on the building, book sale sign and street signs will happen very soon. Also cast shadows.

Monday, May 18, 2009
Day 7
Today began the second half of the public portion of this project and it seems to be right on schedule. It's kind of a leisurely pace to paint, which is great because it allows for a lot of interaction with visitors. Many folks saw the article in the Advocate and wanted to tell me. Nice. Also one very sharp lady wanted to tell me that the trees I have been referring to as cherry trees are actually crab apple trees. Oops. Today I fine-tuned some areas and added more details - a few more people added, and I worked on the curbs (my chronic problem). Next I will do the foreground and perhaps remove the masking and very soon I'll tackle the sky. I've been thinking about that too.


Friday, May 15, 2009
Artist in Residence - Days 4, 5, and 6
My original concern that the painting was going to fast is no longer a concern. As usual the tiny details do take the longest time to complete. I guess I forgot that. Every bit of the painting is being done in the library, none at home. Here are pictures from this week's painting.
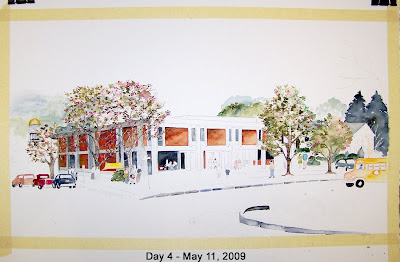


Next week I plan to add at least another vehicle and maybe a couple more people, maybe even some you will all recognize!!!!

Next week I plan to add at least another vehicle and maybe a couple more people, maybe even some you will all recognize!!!!
I'm certainly enjoying the "local color" at the library.....I have found that people do indeed like to come over and chat, some even pull up a chair and stay a while. About half of the time we talk about the painting, the project and the process, other times its about almost anything at all. I love the fact that some people bring me their own works to see too. And of course, I cannot say enough about the library staff, how everyone has made it a point to make me feel welcome. This is really fun.
A very nice article about this project appeared in this week's Weekly Advocate...front page, with a picture! My 15 minutes of fame. Thank you to Judi Fairweather for a great story. Take a look... http://www.advocateweekly.com/ci_12361922.
Thursday, May 7, 2009
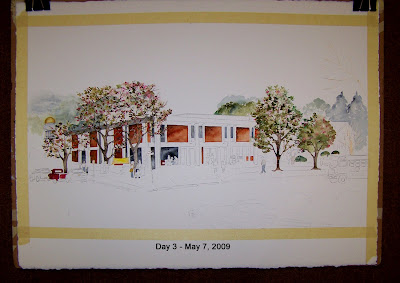
Day 3 Painting in the library
I'm worried that it is going to be done way too soon...I may have to come up with an alternative plan...which may be fun too!
I love the fact that people are very comfortable coming by to chat and ask questions.
Here's me painting in the library on Day 3.

And here is the painting at the end of day 3
. 
Wednesday, May 6, 2009
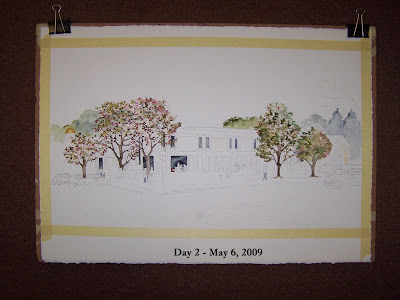
Day 2 - May 6, 2009
Day 2 of painting in the library - Today I added another cherry tree, and then I masked all the trees and let it dry. The masking fluid dries clear, but if you look at the image in person, you would see a little gloss to it. Once that dried, I added some trees in the background, the dome, some windows, and started with some of the other details.

Monday, May 4, 2009
Artist in Residence - Day 1
Monday, May 4, 2009 - Painting at the Library
Day 1 as "Artist in Residence". Why do I get so nervous? It was great fun and people did actually talk to me. Got some of the cherry trees painted. On Wednesday I hope to finish the trees and start on the masking in order to work on the areas behind the trees. That will be the fun part.

Day 1 as "Artist in Residence". Why do I get so nervous? It was great fun and people did actually talk to me. Got some of the cherry trees painted. On Wednesday I hope to finish the trees and start on the masking in order to work on the areas behind the trees. That will be the fun part.

Sunday, May 3, 2009
About Masking and Layering
This is a fairly complicated painting with many layers over-lapping the other. With watercolors, at least in this particular case, I do not want to be painting over areas that have already been painted (you can do that with oils and acrylics). In order to keep all layers fresh and distinct, I will use masking fluid (one brand is called "Frisket").
And this is where some planning comes in. First I will paint the cherry blossoms, laying in the pinks. Once that has dried thoroughly, I will add some of the green leaves and some branches. While waiting for that to dry, I can start painting some of the other less complicated ares that don't involve layering.
OK, back to the trees......once totally dry, (and I do mean TOTALLY or the paper will adher and rip when the mask is removed) I'll apply masking fluid very carefully to all the areas that I have painted. By doing this, those areas become protected. Once that has dried, I can paint the areas behind the trees, like the building. I'll be working from the foreground to the background. I may even mask other layers, but my main concern right now involves the cherry trees.
Masking is also a great way to create crisp edges and lines. It is especially nice when doing window panes, picket fences, lettering and for saving the whites in tiny areas that might otherwise get painted over. I'll be doing a fair amount of this type of masking as well.
It's fun when it's time to remove the mask. I'll use either my fingers or a "pickup".... it reminds me in a small way of "pulling a print" off a press...you're pretty sure what you will see, but it's always a little surprising too.
There was a very nice article in the April 23 issue of the Pittsfield Gazette about this project...I have it posted on my website. Here is the URL if anyone would like to read it:
http://margebride.com/Pitt-Gazette-4-23-09.htm
Tomorrow, Monday May4, I start painting in the library. I'll be running a little slide presentation continually so visitors can see the process, all my sketches and preliminary studies will be on display, and of course, I'll be there to not only paint, but to answer any questions.
Transferring the Image
The image has been printed very faintly in light blue onto 11” x 17” paper in segments, then it is taped together and used to trace the lines onto the watercolor paper. Not everything is traced, ome will be painted freehand.
Next step - masking.
Thursday, April 16, 2009
Next Step - Getting Ready to Paint
Transferring the image to watercolor paper can sometimes be very tedious. Because the paper is somewhat fragile, one has to be careful. But first.....
I scan the final drawing into Photoshop, which will have to be done in segments since my scanner bed is only 8" x 12". Once that is done, I then resize the image to that of the painting. In this case the painting will be approximately 20" x 28".
Next, I will print it out in sections, then tape it together. Voila, I now have my image to trace.
I use graphite paper to lightly trace the image onto the w/c paper. I try to be careful to press very lightly, and I don't transfer everything...some things I will paint freehand, like the blossoms, branches and bricks, and other small items, but I need the traced guideline when doing a structure. The graphite is erasable, but even though I'm using 300 lb paper which is pretty tough, I still am aware that erasing will change the surface of the paper, so the less, the better.
I find a lot of my individuality comes from the application of the paint...knowing when to go wet or dry, selection and mixing of colors. I don't want to transfer so much of the image that it seems like a paint by number, even though I did the drawing, but sometimes I have trouble drawing straight lines so I really work hard at getting the lines correct.
Another part of the "prep" before painting sometimes involves the application of masking fluid, especially in this type of painting that has many levels. But more on that when the time comes.
I hope to have all this prep work done before I start the painting in the library.

Tuesday, April 7, 2009

Progress update
The final drawing is nearly done....it's a detailed pencil drawing on very beautiful paper which has incorporated all of the elements I have been working on....this too will become the property of the Berkshire Athenaeum when the project is finished. Because so many of my reference photos have been taken at different times of the day and different seasons, I find I've been returning to the site to do more on scene sketching. The curbs and street lines have been throwing me off a bit, but I think I have a handle on them now. But even more important are the cast shadows....they have to be consistent...can't have a 10 am shadow on the front and a 3 pm shadow on the side. So that is what I'm working on now and very soon the final drawing will be posted.
A schedule has been arranged....I hope to see many visitors while I'm painting. A display will be set up that will provide details of the entire process. I'll be located on the main floor, not far from the front entrance.
My Painting Schedule at the library during MAY
Mondays and Thursdays 10 a.m. - 12 noon
Wednesdays 3 - 5 p.m.
I expect the painting to be completed during May, but if not, the same schedule will flow into June.
Monday, March 30, 2009
High Tech to Low Tech
I make full use of any high tech tool I can get my hands on if it will enable me to get to the painting part sooner. After drawing the bare bones sketches, I drew the other items separately...the benches, people, trees, cars, signage.....and then scanned everything. That way I could plug them into the drawing, moving things around and resizing until the overall scene met my approval. Photoshop is my best friend!
Another thing, this scene is going to be during spring, with the cherry blossoms in bloom. I searched the internet to find cherry trees.
If you come to the library during May and June, there will be a slide show explaining the entire process, displaying the reference photos and all of the steps taken from start to finish. Also my drawings and sketches and any other "work product" items will be on display. And 3 days a week during May I will be there painting and will be available to answer any questions about the process. I'll be located in the front part of the library, near the main entrance.
The Selected View
View from the Corner of East and Wendell Streets


The view that was selected by the "Friends of the Athenaneum" for the painting is the one that captures the front and side of the library. Notice I plugged some people into this sketch.
Next step is to finalize the scene with a more detailed drawing. It will become more "populated" with people, some of the positioning will change a bit, more of the pavement and landscaping will be drawn in, there will be shadows and shading, in essence, it will look more finished. However, I can still do some minor adjusting even during the painting stage, sometimes the obvious is not so obvious until that stage...but essentially, this is the view that the painting will be based upon.
Dressing Up the Sketches


Using the two "bare bones" sketches, I added in trees, shrubbery, signage, benches, in order to see which view presented the most interesting and desireable one on which to base the painting. This is how I present my sketches to my house portrait clients as well. But let's face it, a sketch is not a painting and you need to trust the artist to turn that sketch into a beautiful painting. And you also need some imagination. There's a lot more that will go into the final detailed drawing, but right now we just want enough to select the best view for me to focus on.
Monday, March 23, 2009


Step 3 - Bare Bones Sketching
When I draw a building, I try to concentrate on the "bare bones" ... no trees, signage, benches, not even shadows or shading, nothing that will obstruct the skeleton of the structure in any way. Even if trees or signage will ultimately cover some sections of the building, it is important to understand what is behind them.
Also, before drawing the "big picture", I often practice drawing some of the areas that might be challenging.
In this case, all my photos were done during winter, with snow on the ground, and bare trees. In one respect it is great to do the photo shoot in winter, it makes it much easier to see all of the lines of the building. However this painting will be a springtime scene and that required some research into what those trees will look like in the spring with the cherry blossoms ready to pop. The internet can be a life saver sometimes.
Next up, some "bare bones" sketches........


Step 2 - Study the Photos
This is where skill in Photoshop comes in handy. Let's face it, photos do not always give you the real picture....they sometimes lie. They can distort, and often do. I use a digital camera to take "section" shots, then I "morph" them together using photoshop, correcting the distortion.
Close ups of architectural details help when drawing and the distant shots (or memory) are just not doing it.
But remember, it's always good to do some sketching onsite as well.
Next - three views of the building that I thought should be considered for the final view.
Close ups of architectural details help when drawing and the distant shots (or memory) are just not doing it.
But remember, it's always good to do some sketching onsite as well.
Next - three views of the building that I thought should be considered for the final view.
Step 1 - Getting to Know You
Before touching pencil to paper, I feel it is critical to visit the property, get to know it....understand its place in the "neighborhood", the overall environment, the architectural details, the colors, the textures, the trees and shrubbery. A portrait of a building is not unlike a portrait of a person...it has history, character, charm, personality....and that is what you want to capture. Which is why I say visit the site many times before even taking pictures.
Next, take tons of pictures, different angles, perspectives, close-ups, distant shots, at different times of the day, and also the neighboring buildings.
Next, take tons of pictures, different angles, perspectives, close-ups, distant shots, at different times of the day, and also the neighboring buildings.
Getting Started!
Welcome to the very first entry for the Berkshire Athenaeum Portrait blog.
First a little history .... what is this project all about anyway?
Many months ago I was invited by the Friends of the Berkshire Athenaeum (Pittsfield's public library) to paint a new portrait of their beautiful facility to commemorate the building's 35th anniversary. When the painting is completed sometime this June, it will hang in the front entrance of the library.
The actual painting of the portrait will take place during business hours in the library, and anyone who is interested is invited to watch it unfold. A schedule will be posted, and I will be there at different days and hours in order for those with varied schedules to come and witness art in the making.
But the project involves so much more.
This blog is just one part of a multi-faceted approach to provide the public with information about what it takes to paint a building portrait in watercolor. Read the recent press release issued on March 18, 2009 for more information, and stay tuned right here as I frequently add more information.
Just so you know, I have never done anything like this before (painting in public) so I am both a bit nervous and very excited. I expect to be painting in the library the latter part of April, all of May and maybe the early part of June. Besides actually painting and answering any questions, I will display my preliminary sketches and drawings and also run a slide show continuously on a digital frame so you can see what has already taken place.
Next entry will explain the "behind the scene" steps that must be taken before even thinking about painting.
Subscribe to:
Posts (Atom)
